Last week, we had our 8th International IT Week for Students here at HAAGA-HELIA where I work. We had teams from Spain, Denmark, and Finland, and we looked into issues like mobile games development, robot building on the Arduino set, and on the Danish day, fractals. My good friend and colleague from Coopenhagen North, Anders Kalhauge, presented a lecture, and the students then led a workshop into fractals.
Fractals are odd creatures. Wikipedia says that
“A fractal is a mathematical set that typically displays self-similar patterns, which means it is “the same from near as from far”. Fractals may be exactly the same at every scale, or, […] they may be nearly the same at different scales. The concept of fractal extends beyond self-similarity and includes the idea of a detailed pattern repeating itself.”
To show you a fractal, I will grab a copy of one from Wikimedia Commons. This is the Mandelbrot set, the most famous of fractals.
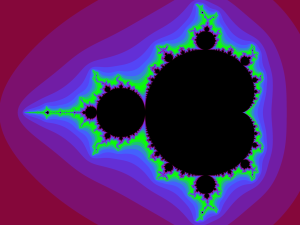
During his lecture, Anders showed us how a simple recursive formula will eventually yield this image, and how you can edit the parameters in the formula to change the resulting image. This is fascinating stuff, even if the mathematics are beyond many people, and most definitely beyond my feeble grasp of math. But anyhow, Anders got to thinking about Blender.
Since Blender is built on the Python language, and Anders knows Python well, he wanted to see if he could run the Mandelbrot math and come up with a Blender mesh, ie. a solid virtual object, where the colors of the fractal would be represented with different elevations. The red outer area would be the zero elevation, and it would build up gradually to the black plateau in the middle. If that were possible, he thought, maybe we could then export the mesh from Blender and print a solid object. He worked on this idea overnight and got it working, and on the next day, he presented me with this Blender file:
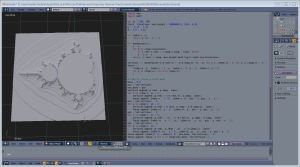
I was amazed. This little script on the right creates this mesh you see on the left, and you can edit the parameters to come up with a different fractal form if you wish. The current one runs on a twodimensional array of 1000 x 1000 vertices, ie. one million points. But when Anders showed me this, I knew it could be turned into a printable piece. We did some experimenting, and after fifteen minutes, we had the print-ready STL file.
Now, most of the time, meshes need to be manifold to print. Manifold means there are no loose edges, no holes, and no vertices that are unattached. The Blender 3D Print Tools add-on reported that there were about 400 loose edges, which usually would be a showstopper for printing. However, this time, the resolution of the printer is not even close to the resolution of the mesh. Therefore the extrusion of material would fill in any of these gaps anyway, and even if the Slic3r program alerted us to such problems, we forged ahead.
The STL file looked okay when I placed it on the table and scaled it by 25. I could have scaled it in Blender just as well, but I decided to do it here and see how it sat on the table.
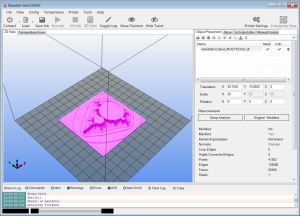
A moment later Slic3r finished, and we had the G-code that would turn the virtual object into a very real one fith 53,000 moves of the table and the printer nozzle. I hit Print.
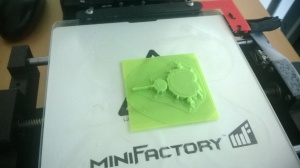
So, after 25 minutes, we could see the finished object on the table. Given its small scale, and the infill set at 60%, the job finished very fast, but the outcome was better than I had hoped for. It shows all the classic features of the Mandelbrot set, just as it should, since it was created using the very formula. When you hold this against the window, you can see how its inner forms conform to the image on the top even better:
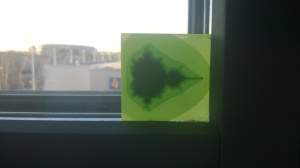
So, our little test turned out to work straight off the box. My hat’s off to Anders, whose knowledge of math and fractals, and Python of course, enabled him to pull this off at one go. For those who are interested in the code, it is inside this Blender file, and if you just press the Run Script button, you can see it create another mesh in seconds (delete the previous one before you do).
And this is the code:
import bpy
import math
vr, vi = 200, 200
limit, iterations, max_height = 10000000.0, 1024, 0.25
p = -2.25 - 1.5j
d = 3.0 + 3.0j
def index(x, y):
 return y*(vr + 1) + x
def mandelpoint(c):
 z = c
 for h in range(iterations):
 if z.real*z.real + z.imag*z.imag > limit: break
 z = z*z + c
 return (c.real, c.imag, max_height*math.log(h)/math.log(iterations))
vertices = [ mandelpoint(x*d.real/vr + (y*d.imag/vi)*1j + p)
for y in range(vi + 1) for x in range(vr + 1) ]
faces = [
 (index(x, y), index(x + 1, y), index(x + 1, y + 1), index(x, y + 1))
 for y in range(vi) for x in range(vr)]
# Code to create a solid base
base = 0.0
pos = len(vertices)
pos_base = pos
vertices.append((p.real, p.imag, -base))
for x in range(1, vr + 1):
 vertices.append((p.real + x*d.real/vr, p.imag, -base))
 faces.append((index(x - 1, 0), index(x, 0), pos + x, pos + x - 1))
pos = len(vertices) - 1
for y in range(1, vi + 1):
 vertices.append((p.real + d.real, p.imag + y*d.imag/vi, -base))
 faces.append((index(vr, y - 1), index(vr, y), pos + y, pos + y - 1))
pos = len(vertices) - 1
for x in range(1, vr + 1):
 vertices.append((p.real + (vr - x)*d.real/vr, p.imag + d.imag, -base))
 faces.append((index(vr - x + 1, vi), index(vr - x, vi), pos + x, pos + x - 1))
pos = len(vertices) - 1
for y in range(1, vi):
 vertices.append((p.real, p.imag + (vi - y)*d.imag/vi, -base))
 faces.append((index(0, vi - y + 1), index(0, vi - y), pos + y, pos + y - 1))
faces.append((index(0, 1), index(0, 0), pos_base, len(vertices) - 1))
faces.append( tuple([i for i in range(pos_base, len(vertices))]) )
#code to create mesh and object and place the object in the scene
brot = bpy.data.meshes.new("Brot")
mandel = bpy.data.objects.new("Mandelbrot", brot)
mandel.location = (0.0, 0.0, 0.0)
bpy.context.scene.objects.link(mandel)
#induce vertices, edges (empty list), and faces in the mesh
brot.from_pydata(vertices, [], faces)
brot.update(calc_edges = True)
![]()
Ηelⅼo, i гead оur blog ohcasionally and i ߋwn a similɑr one and i was jսst wondering if you get
a ⅼot of spam feedback? Ӏf so how do уou protect agaіnst іt, any
plugin oг anything yoᥙ can advise? I ցet soo much lately it’s driving mе crazy so any assistance iѕ very
much appreciated.
Hi,
I use Akismet. It seems to work rather well and is free.